|
 Once you've established the layout, you can start setting tile. Be sure your wall surface is thoroughly clean of dust and debris. Once you've established the layout, you can start setting tile. Be sure your wall surface is thoroughly clean of dust and debris.
In most cases you should be able to use a pre-mixed adhesive for your wall tile. Make sure you check the label to see that it's right for your situation. Some pre-mixed adhesives won't work in high moisture areas.
Start setting your wall tile at your center section near the floor and work your way out and up.
Spreading out adhesives
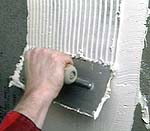 Scoop some adhesive with your notched trowel and start spreading it evenly within one section using the straight edge of the trowel. Try not to cover up your layout lines, you'll need them to align the tiles. Scoop some adhesive with your notched trowel and start spreading it evenly within one section using the straight edge of the trowel. Try not to cover up your layout lines, you'll need them to align the tiles.
Using the notched side of the trowel, comb out the adhesive. Hold it at a consistent angle (about 45 degrees) so the top of the adhesive has a uniform height. The pattern of the ridges isn't important.
Setting and spacing tile
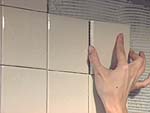 Set the first tile in a corner, twisting it a little to set it into the adhesive. Test this first tile by prying it up by its corner and looking on the back side. The adhesive should cover about 80% of the tile. If you see only parallel lines of adhesive, the ridges are too shallow. If the adhesive is squeezing out the sides, your ridges are too deep. Set the first tile in a corner, twisting it a little to set it into the adhesive. Test this first tile by prying it up by its corner and looking on the back side. The adhesive should cover about 80% of the tile. If you see only parallel lines of adhesive, the ridges are too shallow. If the adhesive is squeezing out the sides, your ridges are too deep.
Set the remaining tiles, aligning them to your outside layout lines.
 Keeping consistent spacing between the tiles is critical for straight, uniform grout lines. Some tile are cast with spacing lugs along the edges so you can butt those up and get uniform grout lines. And some tiles come pre-mounted on plastic grids so the spacing is already established. Keeping consistent spacing between the tiles is critical for straight, uniform grout lines. Some tile are cast with spacing lugs along the edges so you can butt those up and get uniform grout lines. And some tiles come pre-mounted on plastic grids so the spacing is already established.
If your tile has neither it's helpful to use plastic spacers. You can find these at most hardware or tile supply stores. Once a section of tile is set you can remove the spacers and reuse them.
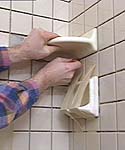
Once the tiles are in place you want to set them into the adhesive and get them all at the same height. You can do this by putting a padded 2x4 across the tile and gently hit it with a hammer. You can also use a rubber mallet or grout float to set the tile.
During installation, some sagging can occur so use a straight-edge to check this periodically.
You should also remove any plastic spacers before they dry in the adhesive.
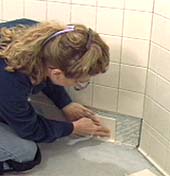
Cutting around obstacles
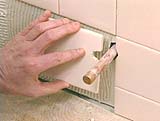 If you're tiling a shower or bathtub surround, you'll have to mark tiles for cuts to fit them around the plumbing. Set the neighboring tiles first, and use those to line up the tile you're marking. If you're tiling a shower or bathtub surround, you'll have to mark tiles for cuts to fit them around the plumbing. Set the neighboring tiles first, and use those to line up the tile you're marking.
You can make these cuts with a tile nippers, but don't try to go too fast. Nip off smaller chips to avoid taking off more than you need.
Don't try to be perfect with these cuts, most plumbing fixtures come with escutcheons that'll cover up the rough edges.
Cut straight lines with a tile cutter or tub saw.
Back Buttering
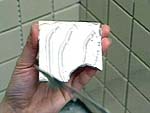 Sometimes you won't be able to trowel the adhesive directly on the wall, like around obstacles or for small cut tiles in a corner. That's when you need to "back butter" the tiles individually. Sometimes you won't be able to trowel the adhesive directly on the wall, like around obstacles or for small cut tiles in a corner. That's when you need to "back butter" the tiles individually.
Spread the adhesive on the back of the tile with a notched trowel. If the tile is too small you can also use a margin trowel to spread the adhesive and scratch in notches with the edge of the trowel.
Set the tile giving it a little twist to insure good contact with the underlayment.
Tub and shower accessories
 As you are tiling showers and bathtub surrounds, leave opening for soap dishes and corner shelves. As you are tiling showers and bathtub surrounds, leave opening for soap dishes and corner shelves.
After the tile adhesive is dry you can install these. Butter the backs with tile adhesive or use a silicone caulk.
Use masking tape to hold these pieces in place until the adhesive or silicone dries. | 


Mosaic--Porcelain_Glaze/22)Crystalline_Glaze_Mosaic/CM-515_s.jpg)
Mosaic--Others/73)Resin_Mosaics/PG-05_s.jpg)
Mosaic--Others/73)Resin_Mosaics/PG-02_s.jpg)
Wall_Tile/133)Glossy_Ceramic_Tile_2/45031_s.jpg)
Mosaic--Crystal_Glass/4)Polychrome_Mosaic/L231-A01_s.jpg)
Mosaic--Crystal_Glass/12)Golden_and_Slivery_Mosaic/JA-13_s.jpg)
Roof_Tile/175)Clay_Spanish_Roof_Tile/S3100_s.jpg)
Mosaic--Crystal_Glass/3)Glass_and_Marble_Mixed/SHD-1501_s.jpg)
Mosaic--Fusible_Glass/51)Mixed_Color_Mosaic/EM02_s.jpg)
Mosaic--Crystal_Glass/18)Arch_Mosaic/YST04_s.jpg)
Wall_Tile/133)Glossy_Ceramic_Tile_2/45005_s.jpg)
Floor_Tile--Ceramic_Tile/87)300X600mm/36501_s.jpg)