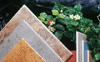
Ceramic Tile
Installing Floor Tile
Follow these simple instructions for laying resilient floor tile of any type. Completely read all instructions before starting the job. If any part is unclear, call or visit the store where you purchased the materials and ask for further information.
| �Tools and Materials |
|
|
Floor Tiles |
Sandpaper |
Level |
| Chalk Line |
Chalk |
Scraper |
| Mastic |
Steel Square |
Tape Measure |
| Mastic Trowel |
Ordinary Scissors |
Cement |
| Plane |
Brush |
Hand Cleaner |
STEP 1

FIG. 1 - Plane down high spots and renail loose boards.
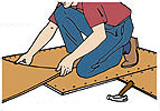
FIG. 2 - Cover original floor with plywood if necessary, stagger the joints and nail every 4". |
|
PREPARE THE BASE FLOOR
- Start by removing all wax, grease or oil with a good, environmentally safe chemical or cleaner. Remember that adhesives will not adhere where oil or grease is a part of the base.
- Next, plane down high spots and renail any loose boards on wood floors (Fig. 1). Any rough spots will gradually show through the floor tiles and may ruin the appearance.
- If the original floor is in poor condition, it may be necessary to cover it with sturdy plywood or untempered hardboard (Fig. 2).
- When laying a new floor, nail every 4" along the edge and 4" apart in all directions. Stagger the panels so you don't have four corners together. Start in the center of the panel and work toward the edges. Use coated or ring-shanked nails, and be sure heads of the nails are even with board level.
|
|
STEP 2
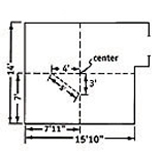
FIG. 3
|
|
START FROM THE EXACT CENTER OF THE ROOM
The first run of floor tile should be started from the exact center of the floor, so use these steps to locate the center of the room:
- Locate the exact center on each wall and mark that center spot.
- In rooms with offsets or irregularities, ignore the irregularities in the measuring process (Fig. 3).
- Hold a chalk line at the center position on facing walls, as marked and snap it on the floor. The exact center will be marked at the point where the two lines cross. The example in Fig. 3 shows a room 15'10" x 14' with a slight offset.
- To check for accuracy, measure 3' in one direction and 4' in the opposite (90��) direction. When measured from true center, the distance from the 3' marking to the 4' point will be exactly 5'. If this is not the case, remeasure and rechalk each wall to find the true center. This is essential for a quality finish.
|
|
STEP 3
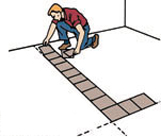
FIG. 4 - Lay loose tiles along chalk lines.
FIG. 5 - If distance is more than 8" or less than 2", remark.
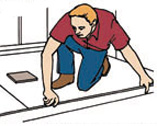
FIG. 6 - Move center line 4 -1/2" closer to parallel wall and remark.
|
|
MAKE A FINAL CHECK WITH LOOSE TILE
- Start at the center point and lay loose tiles along marked lines from center, as shown in Fig. 4. This procedure provides an opportunity to make adjustments if the center is not correctly marked.
- After you have laid a full run of loose tiles along the chalk lines toward each wall (Fig. 4), measure the remaining distance between the edge of the last tile and the wall on each run.
- If the distance between the last tile and the wall is less than two inches or more than eight inches, you will end up with an extremely narrow cut of tile (Fig. 5).
- To correct, adjust the center line that is parallel to the wall by 4-1/2" (half a tile) closer to the wall and remark (Fig. 6).
|
|
STEP 4
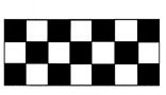
FIG. 7 - Examine pattern or grain when planning layout.
FIG. 8 - Many designs can be created with tiles. |
|
PREPARE THE PLAN FOR TILE APPLICATION
- Open all cartons of tiles that are to be used. Conveniently arrange them so you select tiles out of each carton on an alternating basis. This will help to prevent any noticeable color variation in tiles boxed together.
- Next, study the tile patterns and plan your laying pattern. If the tiles are all one color, plan the pattern according to the grain (Fig. 7).
- You may choose to alternate the run of the patterns (as shown), or you may decide to lay patterns in one direction. Whichever pattern you choose, it is critical to plan in ../advance.
- For tiles of varying colors, plan your design carefully before applying the first tile (Fig. 8). This will influence your selection of starting tiles.
|
|
STEP 5

FIG. 9 - Apply adhesive to one-quarter of the floor.

FIG. 10 - Let dry until tacky. Cement should dry a little longer if it sticks to your thumb. |
|
APPLY THE TILE CEMENT
The next step��Cnow that you have correctly marked the center of the room and selected the tile designs and patterns��Cis applying the adhesive for the tile. If you are using self-sticking tile, skip this section.
- Read all instructions for the product and follow carefully. Begin by spreading an even coat of adhesive over one-fourth of the floor. Most adhesives are applied with a notched trowel (Fig. 9), but some are still applied with a brush or roller.
- In most cases, floor tile cement will dry to the proper consistency in about 15 minutes. However, your exact time may vary depending on humidity, temperature, etc., in the room where you are applying the tile.
- After about 15 minutes, place your thumb onto the cement (Fig. 10). The cement should feel tacky but should not actually stick to your thumb. If it does stick, allow a little longer for proper drying.
- When tacky but not sticky, the cement is ready for the application.
|
|
STEP 6
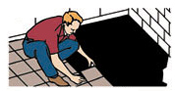
FIG. 11 - Start at center. Lay tiles row by row to one wall.
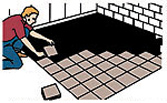
FIG. 12 - Lay tiles alternately toward each wall to enhance the appearance.
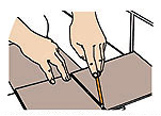
FIG. 13 - After field tiles are down, measure, cut and lay edge tiles.
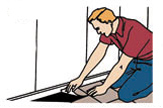 FIG. 14 FIG. 14 - Border tile will fit exactly into place.

FIG. 15 - Make paper pattern for cuts around pipes.
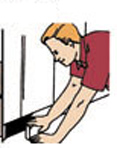
FIG. 16 - Vinyl cove base is sometimes added.
|
|
LAY THE FLOOR TILES
- Start laying the tile at your markings in the center of the floor (Fig. 11). It is important that the first tile is exactly square with the lines. If the first tile is started wrong, all other tiles will also line up incorrectly.
- Be sure each tile is butted firmly against the previous one, leaving no gaps.
- Do not attempt to slide tiles into place. Lay each tile firmly into position on the cement.
- Proceed by laying tiles alternately, according to your plan, toward each wall as illustrated in Fig. 12. This helps to counteract expansion and contraction of the tiles while enhancing the appearance.
- To cut the border tile easily and accurately, place a loose tile squarely over the last field tile in the row (Fig. 13). Then take another tile, butt it against the wall and mark, as illustrated. Cut the tile along the marked line using ordinary scissors. In a cold room, you should warm tiles slightly before cutting.
- The cut tile will now fit securely into the border space. Be sure this tile is placed face-up and at right angles to the grain of the tile below it. This ensures the correct pattern when it is laid (Fig. 14).
- When it becomes necessary to fit tiles around pipes or other obstructions, simply cut a paper pattern that fits around such obstructions and trace the pattern on the tiles. Then cut with ordinary scissors (Fig. 15) and place around obstruction.
- You may want to consider adding a vinyl cove base of matching or contrasting color (Fig. 16) to add to the appearance and to make the floor easier to clean.
IMPORTANT NOTE
Do not wash your new tile floor for at least one week after installation. |
|
 | |


Mosaic--Porcelain_Glaze/22)Crystalline_Glaze_Mosaic/CM-515_s.jpg)
Mosaic--Others/73)Resin_Mosaics/PG-05_s.jpg)
Mosaic--Others/73)Resin_Mosaics/PG-02_s.jpg)
Wall_Tile/133)Glossy_Ceramic_Tile_2/45031_s.jpg)
Mosaic--Crystal_Glass/4)Polychrome_Mosaic/L231-A01_s.jpg)
Mosaic--Crystal_Glass/12)Golden_and_Slivery_Mosaic/JA-13_s.jpg)
Roof_Tile/175)Clay_Spanish_Roof_Tile/S3100_s.jpg)
Mosaic--Crystal_Glass/3)Glass_and_Marble_Mixed/SHD-1501_s.jpg)
Mosaic--Fusible_Glass/51)Mixed_Color_Mosaic/EM02_s.jpg)
Mosaic--Crystal_Glass/18)Arch_Mosaic/YST04_s.jpg)
Wall_Tile/133)Glossy_Ceramic_Tile_2/45005_s.jpg)
Floor_Tile--Ceramic_Tile/87)300X600mm/36501_s.jpg)